Inspection and Test Plans

Contents
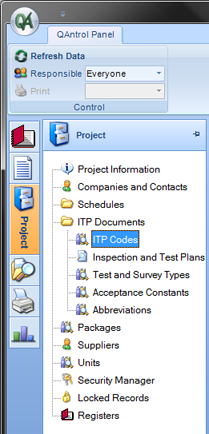
To navigate to the Inspection and Test Plans register in QAntrol:
1.Select “Project” from the main menu
2.The Project sub menu appears
3.Select “ITP Documents”, expand this selection and select “Inspection and Test Plans”, the “Inspection and Test Plans” register appears.
4.Register entries or changes are made using the register control buttons located on the bottom left hand side of the screen.
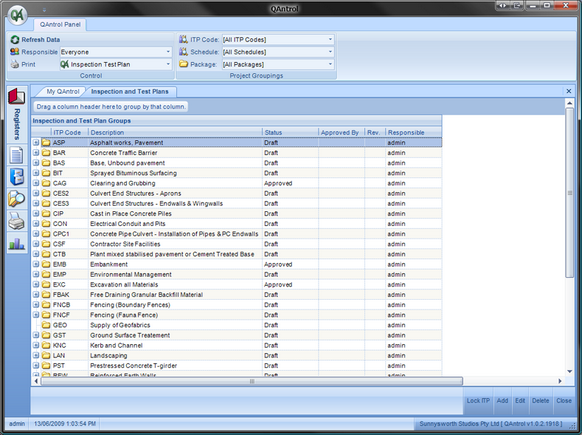
The “Inspection and Test Plans” Register is used to manage the generation and approval of Inspection Test Plans and displays the following columns in the register:
Column Header |
Functionality |
|---|---|
Group |
For sorting and grouping Inspection and Test Plans. The group column is not editable from the Inspection and Test Plans section and automatically updates from entries made in the ITP Code section. |
ITP Code |
Unique identifier given to each ITP. ITP Codes are created in the ITP Code section of QAntrol and may be added to the Inspection and Test Plans register when creating a new ITP document. |
Description |
Title of the ITP. ITP Descriptions are defined in the ITP Code section of QAntrol. |
Status |
ITP have the following status: oNone: No ITP document created oDraft: ITP created, not complete and not submitted for approval. oSubmitted: ITP complete and submitted for approval. oApproved: ITP complete and approved for use. |
Approved By |
Records the name of the person who approved the Inspection and Test Plan. |
Rev |
Records the current revision of the Inspection and Test Plan |
Responsible |
Records automatically the logged on user who generated the Inspection and Test Plan, however the Responsible Engineer field can be edited in the Inspection Test Plan section. |
To raise a new Inspection and Test Plan document in the Register:
1.Select the register control button “Add” located at the bottom right hand side of the Inspection and Test Plan Register, the “Inspection and Test Plan Group Details” editor appears.
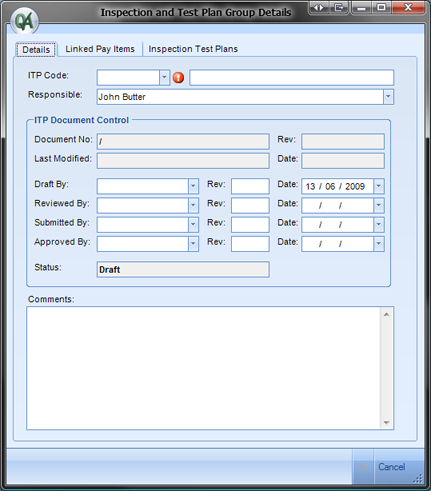
2.Select an ITP Code from the ITP Code drop down field, and the description will automatically populate next to it.
3.The Responsible Engineer field will automatically populate with the users name who created the Inspection Test Plan document, this field is editable.
4.Select OK to save the entry into the Inspection and Test Plan register.
To manage the status of the Inspection and Test Plan document:
1.Select the ITP in the register, a selected ITP will be highlighted in blue.
2.Select “Edit” from the register control buttons, the “Inspection and Test Plan Group Details” editor will be displayed

3.The status of the ITP is controlled by date entry in the “ITP Document Control” section.
4.The Document No. and revision is automatically generated using the Internal Job Number entered in the Project Details section followed by the ITP Code and the current entered revision number.
5.Status “Draft” occurs when a date is entered into either the Draft By or Reviewed By fields.
6.Status “Submitted” occurs when a date is entered into the Submitted By field.
7.Status “Approved” occurs when a date is entered into the Approved By field.
8.The comments section is a text entry field that is used to record any relevant information concerning the ITP approval process.
Inspection and Test Plans may be imported into QAntrol using the Data Exchange or alternatively entered manually line by line.
The Data Exchange functionality is covered in section Data Exchange.
To manually enter or edit existing Inspection and test plan information:
1.Select the ITP in the register, a selected ITP will be highlighted in blue.
2.Select “Edit” from the register control buttons, the “Inspection and Test Plan Group Details” editor will be displayed showing the “Details” Tab.
3.Select the “Inspection Test Plans” Tab, the “Inspection Test Plans” editor will be displayed.
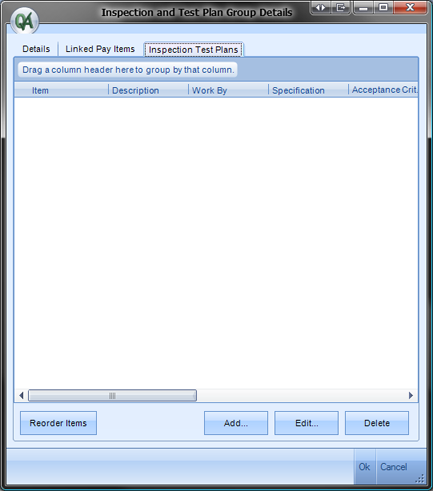
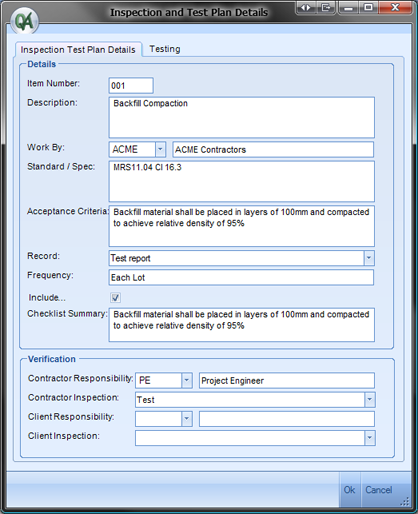
4.Select “Add” from the Editor Control buttons. The Inspection and Test Plan Details editor is displayed which allows the manual entry of each line in the new Inspection and Test Plan.
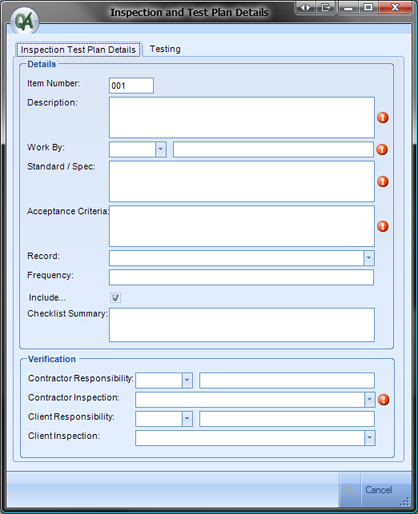
5.The Item Number refers to the line number of the Inspection Test Plan and is automatically and sequentially generated. The line number determines the sequential order of the lines in the Inspection and Test Plan and is editable.
6.Description is a text entry field used to define the line item activity being controlled.
7.Work By is a pre-defined entry field used to identify the entity undertaking the controlled activity. This field is pre-defined in the Project/ITP Documents/Abbreviations section. Entries in this field are usually limited to work by the Main Contractor or by the Subcontractor.
8. Standard / Spec is a text entry field used to reference the applicable contract clauses or drawing numbers that specify quality related requirements of the line item activity being controlled.
9.Acceptance Criteria is a text entry field used to outline the specified minimum requirements to be achieved in order to comply with the project specifications for the line item activity being controlled.
10.Record is a text entry field used to reference the type of document or process used to demonstrate compliance for the line item activity being controlled.
11.Frequency is a text entry field used to specify the frequency of inspection for the line item activity being controlled.
12.Include: The Inspection Test Plan information is also used to generate Lot Checklists. Each line item in the ITP will generate as a line item on the associated Lot Checklist provided the Include option is ticked. Where the Include option is not ticked then the line item will be excluded from the Lot Checklist.
13.Checklist Summary: The Lot Checklist will display for each ITP line the Item number, the first line of text in the Description text box (printed in bold) followed by the entries in the Checklist Summary text box.
14.Contractor Responsibility is a pre-defined entry field used to identify the person working for the Main Contractor who is responsible for verifying compliance for the item being controlled. This field is pre-defined by the User in the Project/ITP Documents/Abbreviations section. Entries in this field are usually limited to Project Engineer (PE), Quality Manager (QM) and Foreman (FM).
15.Contractor Inspection is a pre-defined entry field used to identify the type of Contractor inspection required. This field is pre-defined by QAntrol and is not editable. The options in this field are Check, Hold Point, Inspect, Survey, Test, Visual, Witness Point and Written.
16.Client Responsibility is a pre-defined entry field used to identify the person working for the Client who is responsible for verifying compliance for the item being controlled. This field is pre-defined by the User in the Project/ITP Documents/Abbreviations section. Entries in this field are usually limited to Superintendent (Sup) and Inspector (Insp) and generally relate to verification for Hold Points and Witness Points only.
17.Client Inspection is a pre-defined entry field used to identify the type of Client inspection required. This field is pre-defined by QAntrol and is not editable. The options in this field are Check, Hold Point, Inspect, Survey, Test, Visual, Witness Point and Written, however generally only Hold Points and Witness Points are specified for this field.
18.In the case where compliance involves testing of product, select the “Testing” tab, which is located to the right of the “Inspection Test Plan Details” tab, the “ITP Test Details” editor is displayed.
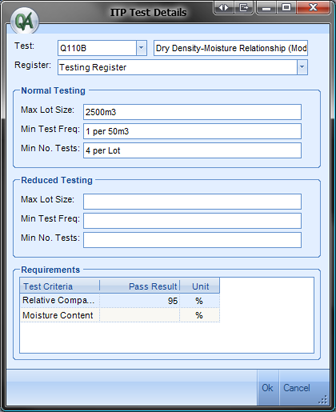
19.Test is a pre-defined field used to specify individual test types. This field is pre-defined by the user in the Project/ITP Documents/Test and Survey Test Types section. Click on the arrow in the box located on the right hand side of the Test text box. Tests previously entered are displayed, select a Test using the mouse and right click to save the selection. The selected Test and Description will populate into the text boxes along with any pre-defined test criteria and units in the Requirements section. The Pass Result can be entered against the required test criteria in the Requirements section where required.
20.Register is a pre-defined field by QAntrol which provides a link to either the Test or Survey Register. Tests associated with Survey measurement are linked to the Survey Register, all other tests are linked to the Test Register.
21.Normal Testing/Reduced Testing allows entry fields for the specification of maximum lot size, minimum test frequency and minimum number of tests.
22.The Inspection and Test Plan development can be viewed in the Inspection and Test Plan register by expanding out the parent tables by mouse clicking on the grey boxes with a + located on the left hand margin.

23.The Inspection and Test Plan is developed line by line until all aspects of the controlled activity have been addressed.
To add or delete a new line into an existing ITP:
1.Select an ITP in the register, a selected ITP will be highlighted in blue.
2.Select “Edit” from the register control buttons, the “Inspection and Test Plan Group Details” editor will be displayed showing the “Details” Tab.
3.Select the “Inspection Test Plans” Tab, the “Inspection Test Plans” editor will be displayed.
4.To Add a new line in the ITP select “Add’ from the Editor Control buttons. A new line with the next sequential line number will be created. Where a new line is to be inserted midway into an existing ITP then assign the item number that represents the required new location of this item within the ITP, this will create an item with a duplicate line number.
5.Where duplicate lines are created for add or line sequence is out of order due to deletion of lines in an existing ITP then select Reorder items. The Reorder items will automatically sequentially re-number the items in the ITP.
6.To Delete an exiting line in the ITP select the line which will be highlighted in blue and select “Delete” from the Editor Control buttons.
To print or PDF an Inspection and Test Plan:
1.Select an ITP in the register, a selected ITP will be highlighted in blue.
2.Select “Print” from the toolbar located at the top of the screen.
3.The Inspection and Test Plan report format will display on the screen
4.To print the report select the “Print” icon located in the toolbar located just above the report. Alternatively select the large Print icon in the top toolbar.
5.To save the report in pdf select the file icon located to the left of the print icon in the toolbar located just above the report.
6.To email a pdf version of the report select the email icon located in the top toolbar.